

Living
walls, or vertical gardens, are the latest great design craze and have been
popping up all over the place. While they are increasingly popular in
businesses and public areas, these living works of art are also especially
handy for people living in small spaces where space for plants is limited.
Though they look gorgeous, aesthetics aren’t the only reason for putting up one
of these babies: having plenty of green plants around can also reduce stress,
increase wellbeing, purify and humidify the air, and dampen noise pollution!
Getting a living wall professionally designed and installed can cost a fortune…
luckily, this DIY version is quick, easy, and cheap!
DIY
Breakdown:
The
Difficulty: Medium – you need to be
familiar with some basic tools, and a considerable amount of strength is needed
when things get heavy
The
Time Commitment: Done in a day
The
Look: Rustic and chunky, modern and
on-trend
The
Cost: Less than $100 (you’ll spend
the most on plants)
Would I
do it Again? Absolutely.
What
you’ll need:
- Shipping Pallet (we got
ours on the side of the road, outside a warehouse)
- Hammer
- Nails
- Thin wood or plastic roughly
the size of the back of the pallet
- Landscaping fabric
- Plastic sheeting
- Staple gun
- Indoor potting soil
- Plants
*Optional:
- 3inch eyehooks
- Heavy weight bearing
metal chain
Step 1:
Remove the slats from the
top of the pallet. This can be a little tricky, but patience and creativity
will get you there!
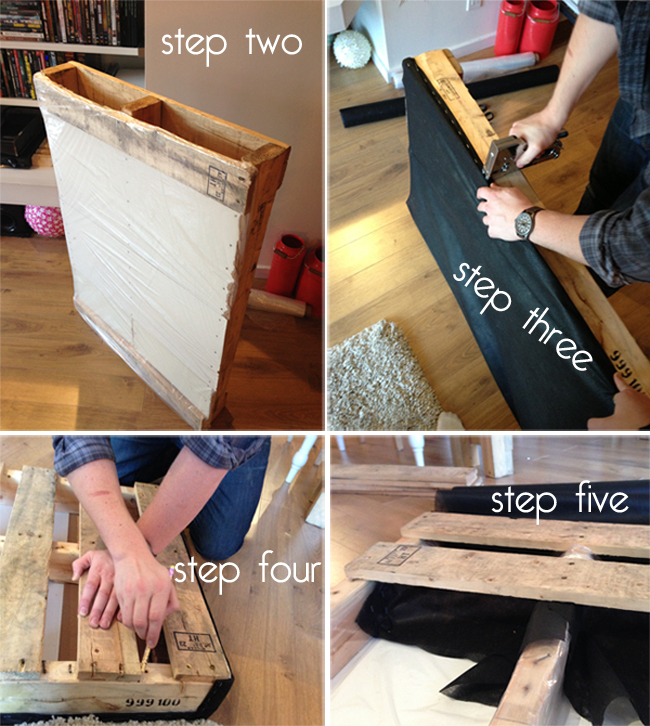
Step 2:
Cover the back of the
pallet with the thin piece of wood, and nail into place. Then, cover the entire
back of the pallet with the plastic sheeting and use the staple gun to secure.
This will protect your walls from moisture!
Step 3:
Cover the back again, but
this time with a double layer of landscaping fabric. This is mainly for
aesthetic reasons, as the plastic is pretty ugly!
Step 4:
Measure where you want your
slats to sit on the pallet. You probably won’t use all of the slats – try to
leave at least 2.5 inches between each slat to make planting easier. Mark where each slat will go with a pencil,
but don’t nail them down yet!
Step 5:
Create the dirt
pockets. Using landscaping fabric,
create a pocket on the underside of each slat. This is easiest when the slats
haven’t been nailed down yet. We cut a strip of landscaping fabric, doubled it
up, and stapled it first to the back of one slat. Then, we placed the slat down
where we made pencil marks, and the stapled the other side of the landscaping
fabric to the pallet. Repeat for each section. Make sure your pockets are deep
enough that they will hold enough dirt, but not so deep that they will droop
too much into the space below!
Step 6:
Nail down your slats!
Step 7:
Fill your pockets with
potting soil, and start planting! We recommend doing this with the pallet
leaning against the wall so that it is almost vertical.
Tip: Don’t overfill the pockets – the dirt should only
come up to the top of each wood slat. Place the roots of each plant into the
dirt on an angle and pack them in tightly.
Step 8:
Hang your living wall! This
is optional, as they would look equally good propped up. We chose to hang ours
using 3inch eyehooks and a heavy-duty chain. If you do hang your living wall,
be sure to drill into studs so that the weight of the garden doesn’t rip out
your drywall.


That’s it! Enjoy your new recycled living wall!
that's a big spoon!
ReplyDelete:)
Deletethere is no spoon
Deletei am gonna ask my husband if he would make us one of these living walls.
DeleteDoes the wood get moldy? Also, I realize you wouldn't want to drench your plants each time you water, but is there a way to keep water from dripping on the floor?
ReplyDeleteNo mold, as it says in the instructions, I used 2 or 3 layers of vapor barrier and landscape fabric on the back, so nothing can get past that. Also the water does not drip as I carefully water each one just enough to moisten the soil.
DeleteWe have had it on our wall now for over a month and no problems so far! Other than the cat trying to destroy it ;)
Cheers! Thanks for looking :)
I love this. Thank you for the detailed instructions. I'm going to try one with succulents and one with strawberries outside.
ReplyDeleteI love this!
ReplyDeleteFantastic idea. I will steal it for my screened porch. Please tell me where you got the ginormous spoon!
ReplyDeleteThe spoon came from Pier One!
DeleteGorgeous! I´ve seen some living walls and they are so nice, they keep your attention on sth good! Nature is good!
ReplyDeleteHappy anniversary Handimania!
What plants have you planted?
ReplyDeleteI love this! I wonder if I could do this myself? How much landscaping fabric did you use? We live almost 30 miles from the nearest store and I need to get enough, without over buying. Did you mix perlite in with your potting soil? My plan is to make this ASAP and keep indoors until safe to put outside, summer outside, then return indoors in the fall to hang in my south facing foyer. It should be full and lush by then!
ReplyDeleteCan you tell us what kind of plants you used for this? They look so nice but I'm a beginner so I'm not to knowledgeable on all the varieties. :)
ReplyDeleteHey there! We used a variety of "low light tropicals" from our local garden centre :) Basically anything that doesn't get too big and can be considered a "houseplant" will be ok in here.
DeleteThis is really attractive.
ReplyDeletePlantscaping
Good article shared.
ReplyDeleteGartenzaun
It should be placed on garden gate.
ReplyDeleteGartentüren
Nice post.Very useful for us.Thanks for sharing it.We have interesting information.
ReplyDeleteVertical green garden
It looks really a great article,.Thanks for this great information,
ReplyDelete"garden landscape design"
"fencing in stoke" looks perfect,.i really like it,.
ReplyDeleteThanks for sharing about fence,
ReplyDeletesliding swing gates sydney
Love love love this! How well would it work for a herb garden?
ReplyDeleteLove love love this! How well would it work for a herb garden?
ReplyDeleteThanks for sharing this kind and informative post,
ReplyDeletehorticulturalist
Is ther a video tutorial
ReplyDeleteIs ther a video tutorial
ReplyDeleteI thought haven’t read such distinctive material anywhere else on-line.
ReplyDeleteBlinds
I think this is the best blog I have been through all this day.
ReplyDeleteVenetian Blinds
This is a great post thank you.
ReplyDeleteI should say some good words for this blog,
ReplyDeleteIt's very nice,
synthetic lawn installation fresno ca
I found many informative article but this article is full of information and well written, and i am so excited to read this.. Thanks a lot.
ReplyDeleteIndoor Vertical Garden
I should say thanks for amazing and helpful post,..
ReplyDeleteBlinds Sydney
All About Indoor House Plants With name and pictures flowering plants, terrace plants, office plants and all kinds of details.
ReplyDeleteIndoor Plants Guide -All About House Plants gro and propagation Information
Nice look.
ReplyDeleteDecorative flower pots
I love gardening i really like to grow fence,.
ReplyDeletekunstgras
thanks for this usefull article, waiting for this article like this again.
ReplyDeleteLiving wall solutions
If you were going to hang this herb garden outside, would you need to varnish it or otherwise weather protect it?
ReplyDeleteBeautiful, I liked your pallet living wall, this is so amazing. Great thanks for sharing the steps of making it. This is so simple. Keep sharing!
ReplyDelete植物牆
Awesome pallet living wall DIY project. Looks really clear to follow.
ReplyDeleteCheck them out and get inspired to make something interesting and fun for your home. Reading Nook Made from Two Wooden Pallets. Fold-Up Pallet Desk. DIY Pallet Swing Bed. Gardening
ReplyDeleteOrganizer. Paracord Laced Pallet Hanging Chair. Pallet Fence. DIY Pallet Coffee Cup Holder. DIY Pallet Pot Rack.
This is a great Post. Your blog has been very helpful for me to making it. Keep sharing. You can buy more products like Artificial Vertical Gardens and Artificial Plants etc at “Designer Vertical Gardens”.
ReplyDeleteThanks for sharing this nice information for me. I hope you will share some more information diy pallet living wall Please keep sharing!
ReplyDeleteالجدران الخضراء
thank you.
ReplyDeleteWe are a Interior Decor and Designer in Thane Green Walls in Thane
Nice project. I have other plans for the pallet. I will build a nice koi pond madeup of wooden pallet, a nice dog house and chicken coop liquidation pallets
ReplyDeleteThanks for the article.Thanks for sharing such great information for me. I hope you will share some more information about Please keep sharing!
ReplyDeleteأ حديقة العشب الصناعي
Nice, DIY recycled wooden pallet project. I have different project idea. I will use it as frame to my indoor koi pond
ReplyDeletewhere to buy pallets of merchandise near me
I think this is a really good article. You make this information interesting and engaging. You give readers a lot to think about and I appreciate that kind of writing.
ReplyDeleteEspresso Beans
Best Ingenious Outdoor Pallet Projects for All Types of DIYerswall pallet design For you who like the rustic style in your home decor , the pallet wall is a beautiful and low cost flooring trend. The reuse of backyard pallet ideas
ReplyDeletein decoration is based on the concept of sustainability and nature preservation.
Insanely comprehensive :)
ReplyDeleteThank you so much,
Now I have something to read during the holidays. This will take a while but well worth it like always
You can read another one here DiYsBest
Flowers and plants are extremely decorative elements that allow us to create cosy, bright and beautiful ambiences.
ReplyDeletehttps://www.verdissimo.com/en/news/indoor-trees-plants
preserved moss
ReplyDeleteLargest selection of top quality preserved moss, for Decorations And Green Walls. Reindeer moss, pillow/bun moss, flat moss, acoustic moss wall panels & moss wall art at attractive prices. D2D Delivery. Online Wholesale.
to get more - https://www.preservedmoss.co.uk/
Very informative blog please share some tips about Artificial Grass installations too
ReplyDeleteI am need these type of planning for my event
ReplyDeletecheck out trending news
ReplyDelete